Workbench: A Provenance Visualization Tool
From June to December of 2021, I was a member of the University of Washington Bothell's Intelligent Networks Laboratory, led by Dr. Michael Stiber. During my time I worked on the Workbench project.
You can read this article or watch this presentation, both cover roughly the same information.
What's Workbench?
Workbench is a graphical user interface that allows you to create, run, and manage the results of a Graphitti simulation. Graphitti is a high-performance graph-based simulator capable of running simulations on the CPU or GPU. It has been developed by a group of students at the Intelligent Networks Laboratory and is currently being applied to computational neuroscience and emergency communications systems.
The simulator requires its parameters to be passed via an XML configuration file. There is no GUI.
Provenance Visualizer
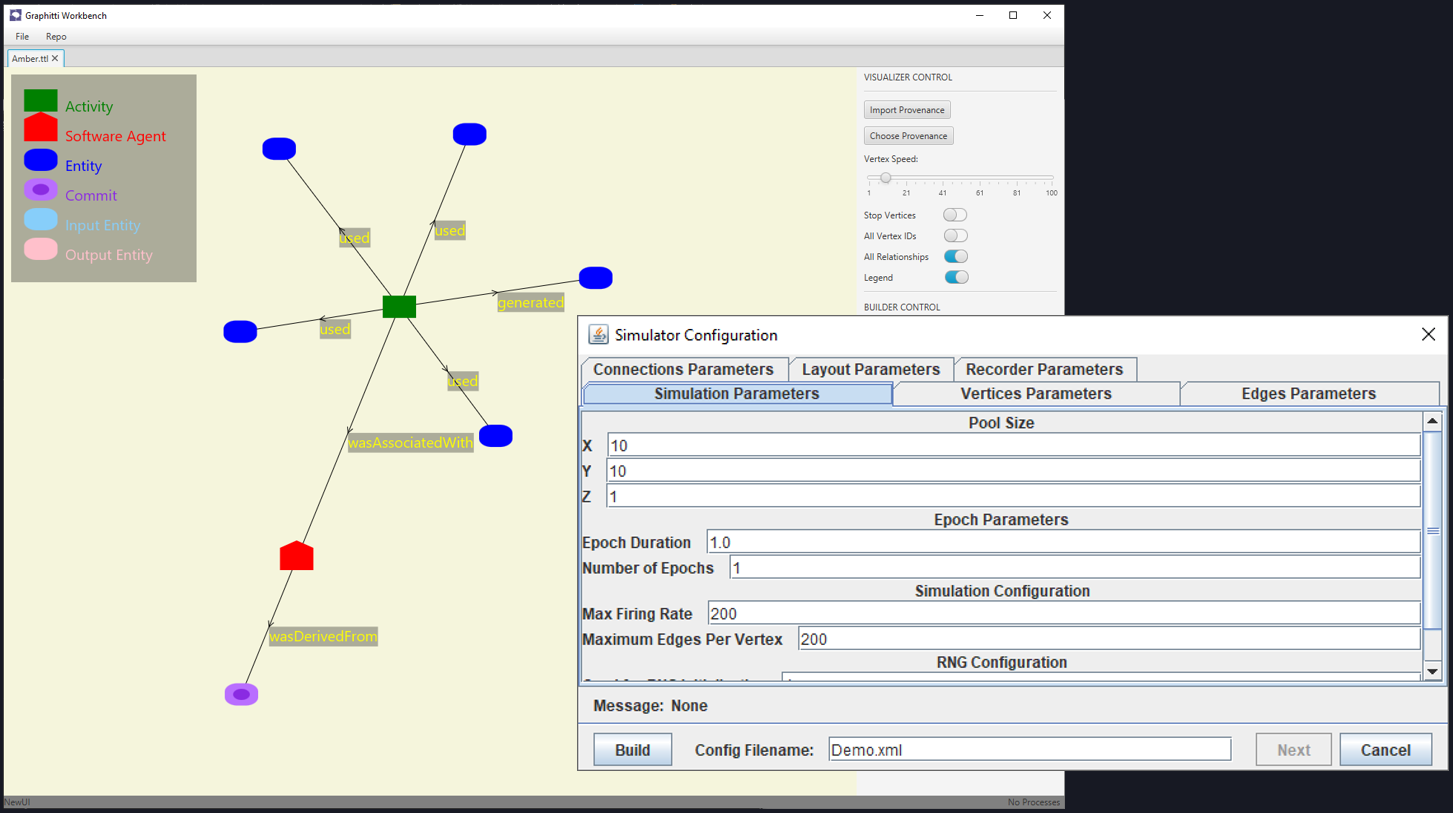
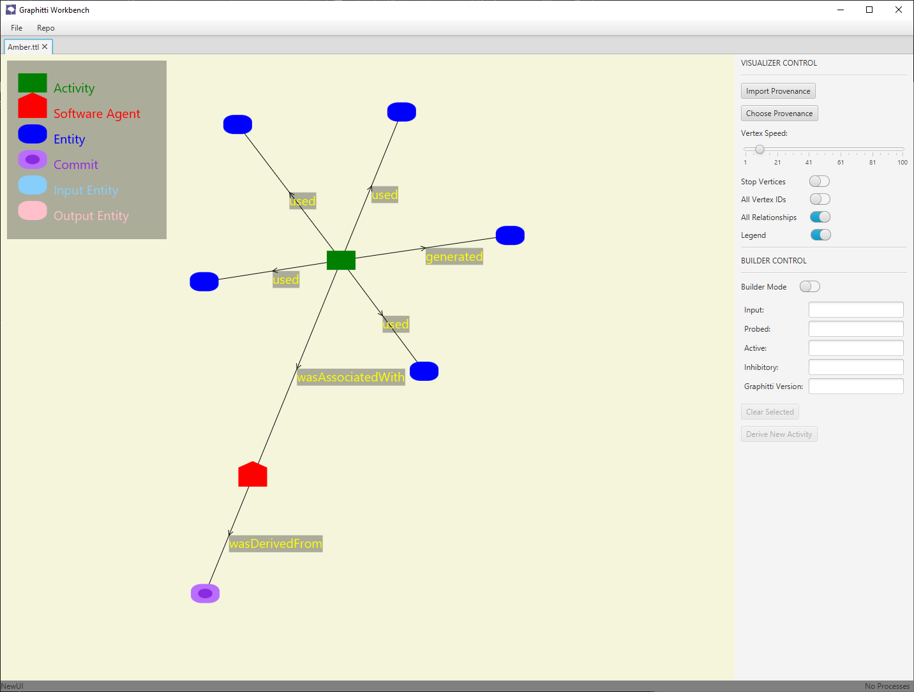
Here is a screenshot of the Provenance Visualizer in Workbench. The graph shown is a representation of all the artifacts associated with a single experiment.
- The purple node specifies the software version of the simulator used.
- The red node represents the simulator executable itself.
- The green node represents the simulation activity (i.e., the simulation being run).
- The surrounding blue nodes represent various input and output files, e.g., the simulation configuration file, the simulation results file, etc.
The more experiments you run, the larger this graph becomes. You can drag one node to another to compare them, for example, if you want to compare the results file from one simulation to another. You can derive new experiments from existing ones, just from a few clicks.
My Contributions
When I started my project, Workbench only worked with BrainGrid, Graphitti's predecessor (the main difference being BrainGrid was specifically designed for computational neuroscience). One of my goals was updating Workbench to work with Graphitti. Additionally, I contributed to the internal developer documentation of the project for all my work to better onramp future contributors.
Graphitti Transition
For the Graphitti transition, I first needed to understand how you run a simulation in Workbench and what was going on behind the scenes to identify what needed to be changed. And I've laid that out here.
How a Simulation is Run in Workbench
When creating a new simulation, Workbench presents a series of dialogs that has you configure the parameters and context of the simulation. The context is where the simulation is being run (locally or remotely) and the version of the simulator to use. This results in a XML configuration file for the simulation, and a bash script which I'll explain in a moment.
These files are then transferred to the remote machine, where we run our bash script. The script downloads the simulator source code, builds it and runs the simulation. The simulator produces an XML results file and the script produces various output files (mostly logs). At this point the simulation is done and the results are ready to be collected.
Back on the Workbench machine, we wait till the simulation is done, at which point we prompt Workbench to retrieve the results to be viewed.
Differences in Updating to Graphitti
There are some small differences in the configuration files. With Graphitti, some parameters have different names, some are in different locations and there are more parameters to define.
The biggest differences however were in the scripts. Graphitti is built is completely different from BrainGrid and they both accessed their runtime files differently. Coming up with a clean solution for this was difficult.
The Solution
I won't dive into much detail, but the issue of the configuration files was simple to solve. The one with the scripts took more time as there was several ways to go about it, each with there pros and cons.
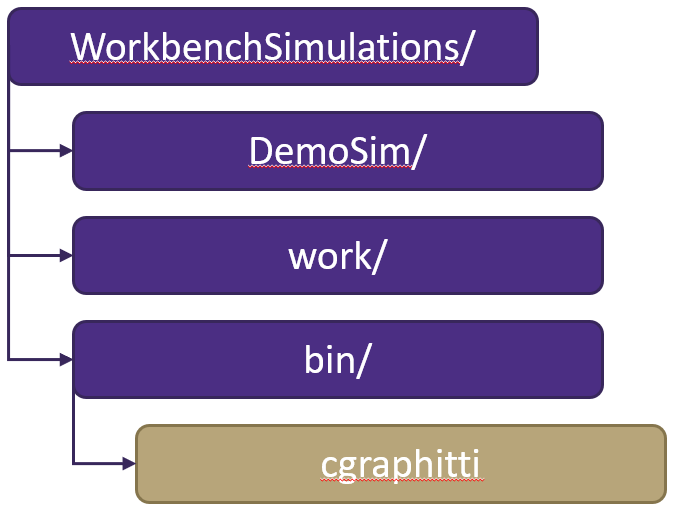
I solved it by revising the directory structure on the target machine where the script is run. On the target machine there is a directory WorkbenchSimulations/ containing all the files for each simulation that was run, except the source code and executable. Previously the location of these items was user-defined, but this is no longer the case. Now, within WorkbenchSimulations/, there is a work/ and bin/ directory. The former is where the source code is downloaded and built, the latter is where the executable resides. Some of the advantages to this approach is if the user wanted to use the same version of the simulator for multiple experiments, we could grab the executable in `bin/` rather than re-build. If the user wanted to use a newer or older version, we could start with what was already in `work/` rather than starting from scratch, making re-building at matter of seconds rather than minutes.
Challenges and What I Learned
One of the challenges I faced was the lack of documentation. When I started my project, there wasn't much internal developer documentation, most of it was for end-users. This made things difficult as I would often spend hours or days trying to understand how something worked. This experience taught me the importance of documentation for collaborative software projects, and is the reason why I documented as much as I could so I could help future contributors.
Additionally, this was the first project I worked on that, unlike every other project I've worked on, I didn't build up from the ground. In the beginning I was overwhelmed by the size of the project and generally lost on how I should get started.
What I eventually ended up doing was setting a goal for myself, e.g., I want to add this new feature. I would then search the codebase for where I needed to make changes, understanding what the code is currently doing and taking notes on the different classes involved and how they interact with each other. This was critical before I started planning my own changes so I could minimize the risk of breaking anything.
See the Code
Here is the source code for the Workbench project.